Tag Archives: diy crafts

DIY Easter Paper Plate Egg Tutorial

Looking for a fun and easy Easter craft activity? Why not try making these adorable Easter Paper Plate Eggs? Follow these simple steps to create your own festive decorations.

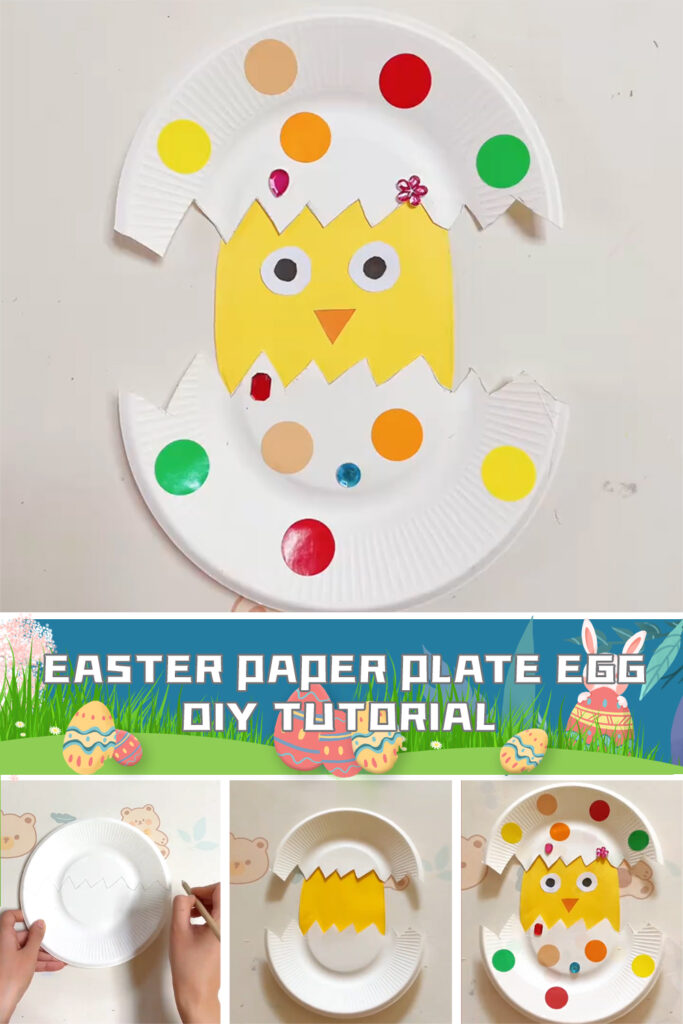
Materials you will need :

Paper plates
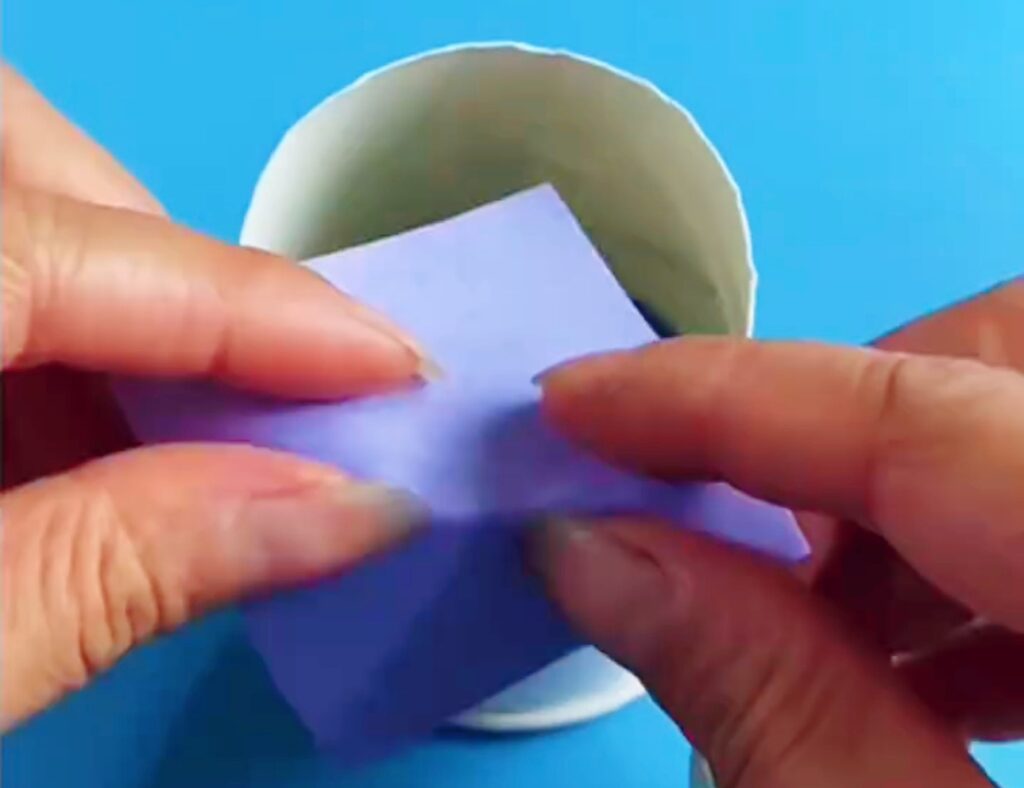
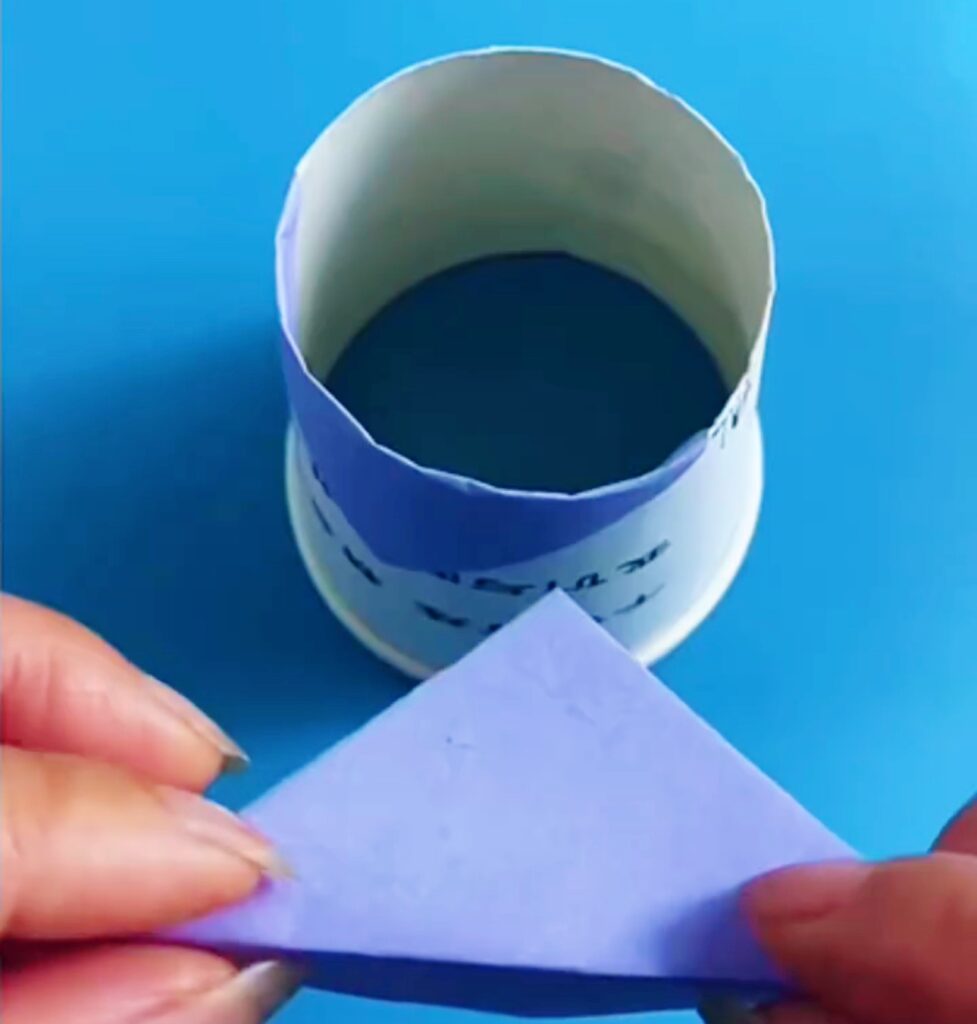
Yellow oval-shaped cardstock
Scissors
Glue
Markers or googly eyes
Colorful paper circles or stickers

Instructions:

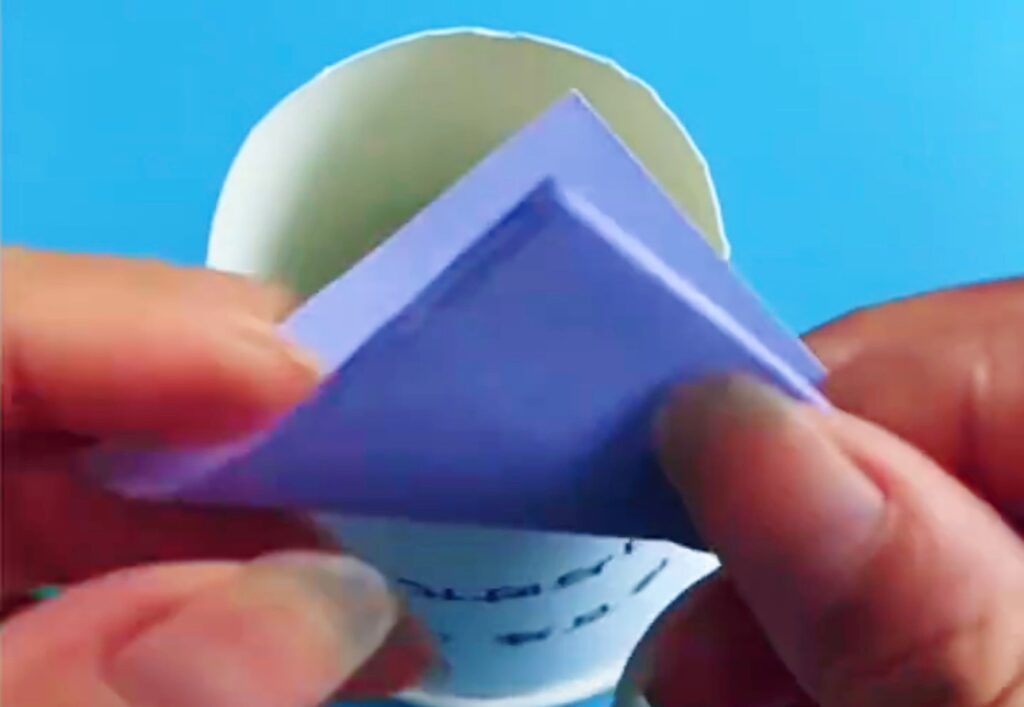
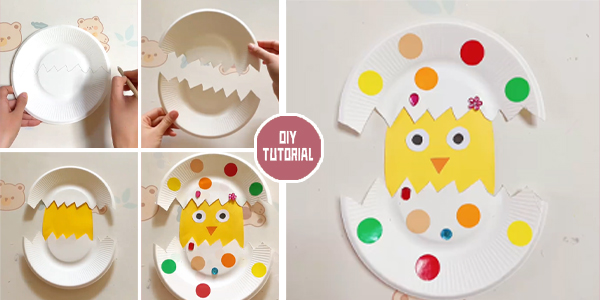
1. Start by drawing zigzag lines on the paper plate to resemble the cracked shell of an egg.

2.Use scissors to carefully cut along the zigzag lines, creating a jagged edge around the paper plate.

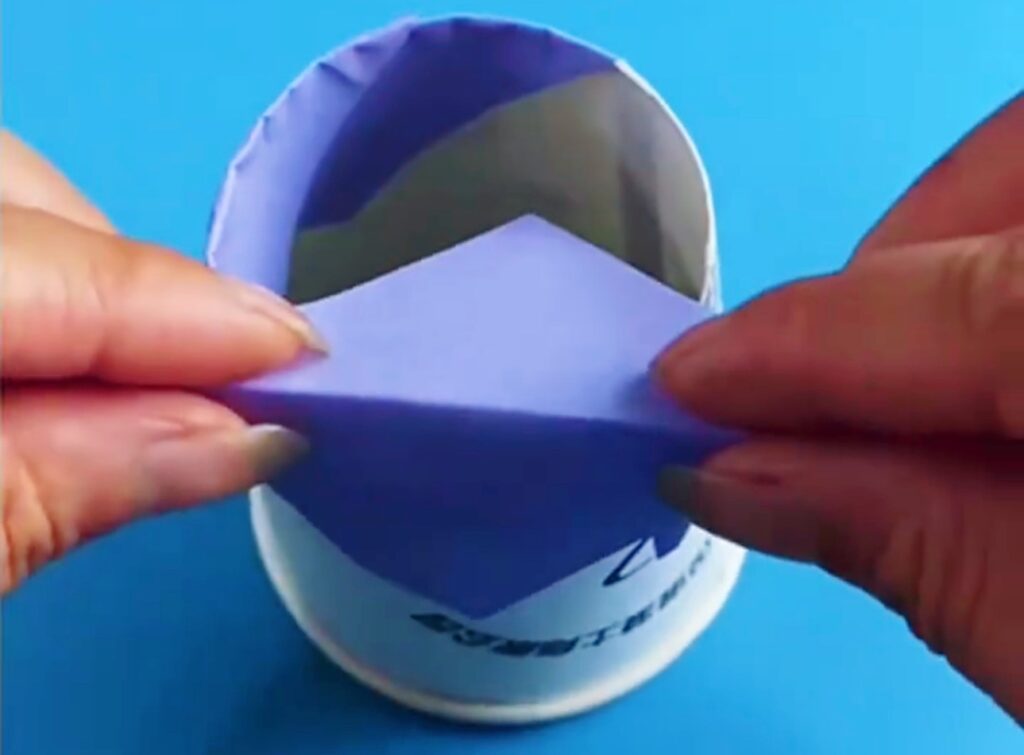
3.Take a yellow oval-shaped piece of cardstock and glue it onto the paper plate to cover the center.

4.Next, use markers or googly eyes to decorate the yellow cardstock with chicken eyes, a beak, and any other facial features you like.

5. To add some extra flair, glue on colorful paper circles around the edges of the paper plate to represent Easter decorations.

Voila! Your Easter Paper Plate Egg is complete and ready to display. Hang it up as a festive decoration or use it as a unique Easter-themed serving platter for treats and snacks.

This  DIY Easter Paper Plate Egg craft is perfect for kids and adults alike, providing a fun and creative way to celebrate the Easter holiday. Get together with friends and family to make a whole flock of these cute Easter Paper Plate Eggs and spread joy and cheer throughout your home. Happy crafting!

YOU MAY ALSO LOVE: 8 Easter Bunny Egg Cozy Knitting Patterns – FREE

DIY Paper Plate Bunny Tutorials

Sharing is Caring:

How to DIY Hedgehog Pumpkin

Halloween is just around the corner, and what better way to celebrate than by creating your very own Hedgehog Pumpkin? This delightful DIY Hedgehog Pumpkin adds a touch of whimsy to your Halloween decor. Inspired by nature, this adorable hedgehog-themed pumpkin is easy to make and promises to bring a smile to everyone’s face.

You may love: Pumpkin Keychain FREE Crochet Patterns

Knit Hedgehog Mittens FREE Patterns

10 Halloween Pumpkin Crochet Patterns – FREE

Materials and Preparation :
To get started on your Hedgehog Pumpkin, gather the following materials: a medium-sized pumpkin, brown and black acrylic paint, a paintbrush, craft foam sheets in various colors, googly eyes, scissors, and a hot glue gun. Once you have everything ready, lay down some newspaper or an old cloth to protect your workspace, and you’re all set for this creative adventure.

Hedgehog Pumpkin Step-by-Step Instructions :

1.Begin by painting your pumpkin entirely brown. This will be the hedgehog’s body. Allow it to dry completely before moving on to the next step.

2.While your pumpkin dries, cut out the hedgehog’s facial features from the craft foam sheets. You’ll need two small black circles for the eyes, a tiny black triangle for the nose, and two brown ears.

3.Once the pumpkin is dry, attach the googly eyes and nose using your hot glue gun. These will give your hedgehog its endearing expression.

4.For the ears, fold the brown foam pieces in half to create a 3D effect. Glue them to the top of the pumpkin.

5. Now, create the hedgehog’s quills by cutting small strips from a black craft foam sheet. Glue these strips all over the pumpkin, focusing on the top and sides to give it that unmistakable hedgehog appearance.

6. Allow your creation to dry completely, and you’ll have your very own Hedgehog Pumpkin ready to charm your Halloween guests!

This delightful DIY Hedgehog Pumpkin project is not only easy but also a wonderful way to add a touch of whimsy to your Halloween decor. Whether displayed indoors or outdoors, your Hedgehog Pumpkin will be a hit with trick-or-treaters and guests alike. Get crafting and enjoy the festive spirit this Halloween!

Thanks to bhg.com for sharing  this wonderful DIY Hedgehog Pumpkin craft.  Get the full tutorial HERE.

Sharing is Caring:

DIY Punch Needle Coaster Free Patterns

DIY Punch Needle Coaster is a great way to get started with punch needle embroidery. It is simple, fun, and easy to make, and can add a touch of color and personality to your home. Whether you choose to follow a pattern or create your own, punch needle coasters are sure to be a hit with anyone who sees them. Today we will explore two of the best free patterns available for making punch needle coasters. Both of these patterns are great for beginners, as they are easy to follow and can be completed in just a few hours. They also require only a few materials, making them a great budget-friendly project. To get started, you will need a punch needle, fabric, yarn, and a hoop. Punch needles come in a variety of sizes, so be sure to choose one that is appropriate for your project. Fabric should be tightly woven to prevent fraying, and hoops help to keep the fabric taut while you work.
Thanks to the all designers for sharing these FREE Patterns ! To get these patterns and tutorials , please scroll down the page and click the links below the pictures.Let’s give punch needle embroidery a try and create our own set of beautiful and unique coasters today! Enjoy!

YOU MAY ALSO LIKE:

Half & Half Crochet Cardigan FREE Patterns

Crochet Shell Pillow FREE Patterns

The first pattern we will look at is from Yarnspirations. Their Red Heart Punch Needle Coaster pattern is a great place to start for beginners. This pattern features a simple, yet elegant design with concentric circles in alternating shades of blue. The pattern is easy to follow and can be completed in just a few hours, making it the perfect project for a lazy afternoon. The yarn used in this pattern is Red Heart Super Saver, a durable and affordable yarn that comes in a wide range of colors.

Get this full instructions here:

1: DIY Punch Needle Coaster pattern

The second pattern we will look at is from LoveCrafts. Their Punch Needle Coasters pattern features four different designs that are perfect for adding a touch of color and personality to your home. The first design is a colorful rainbow, perfect for brightening up any space. The second design is a classic stripe pattern, featuring alternating shades of blue and white. The third design is a fun and whimsical cactus, perfect for adding a touch of the desert to your home. The final design is a simple geometric pattern, perfect for adding a touch of sophistication to any space. The yarn used in this pattern is LoveCrafts°Ø own Paintbox Yarns, a soft and vibrant yarn that comes in a wide range of colors.

Get this full instructions here:

2: DIY Punch Needle Coasters

Sharing is Caring:

DIY Easter Towel Bunny Tutorial

Easter is a wonderful time to get creative and try out new craft ideas. If you’re looking for a fun and easy Easter-themed craft project, then look no further than the DIY Easter Towel Bunny craft. This cute and cuddly bunny is made using just a few simple materials and can be completed in just a few hours.

YOU MAY ALSO LIKE:

DIY Christmas Star Tree Tutorial

DIY Cute Owl Out of Recycled Paper Bag

1.One popular tutorial for making an Easter towel bunny is provided by The Craft Train. This adorable craft is perfect for decorating your home or for giving as a gift to someone special during the Easter holiday. The tutorial is easy to follow and requires only a few materials, including a washcloth, rubber bands, and googly eyes. The end result is a cute and fluffy bunny that will bring a smile to anyone’s face. The Craft Train also provides a printable template for the bunny’s ears, making the process even simpler. The step-by-step instructions are accompanied by helpful photos, making it a fun and easy craft for both kids and adults to enjoy. Not only is this craft a fun way to celebrate Easter, it also provides a practical use for a washcloth. This tutorial is a great example of how a simple household item can be transformed into a creative and festive decoration. Whether you’re looking for a fun activity to do with your family or a unique way to decorate your home, the Washcloth Bunny Craft is a great option.

Get the full instruction here:

1: WASHCLOTH BUNNY CRAFT

2.Another great tutorial for making an Easter towel bunny is provided by The Good Hearted Woman. In this tutorial, a beach towel is used to create a bunny-shaped Easter basket. The tutorial provides step-by-step instructions, complete with photos, to guide crafters through the process of folding and shaping the towel into the desired bunny shape. The end result is a cute and practical Easter basket that can be used to hold Easter eggs, candy, or other small gifts.This towel bunny Easter basket is a fun and unique way to celebrate the holiday and would make a great project to do with kids. The tutorial is easy to follow and requires only a few materials, making it a budget-friendly option for those looking to add a festive touch to their Easter celebrations. Whether used as a centerpiece for an Easter brunch or as a fun way to surprise loved ones with Easter treats, this towel bunny Easter basket is sure to bring a smile to anyone’s face.

Get the full instruction here:

2: BEACH TOWEL BUNNY EASTER BASKET

The great thing about the Easter towel bunny DIY craft is that it’s so versatile. You can use any type of towel or washcloth to create the bunny, and you can customize it with different colors and decorations to make it your own. You can also experiment with different sizes and shapes to create different types of bunnies, from small and cute to large and cuddly.

Sharing is Caring:

DIY Christmas Star Tree Tutorial

I really love the stars, the stars represent the hope of life. I also love Christmas trees. Christmas trees have the meaning of happy reunion, evergreen friendship, and gratitude. The tutorial we introduce today combines the stars and the Christmas tree, which is DIY Christmas Star Tree! This is such a fun craft that kids love it too! Perfect!

You may also like: DIY -sock-snowman-turorial

For make this DIY Christmas Star Tree , what you will need:

1. Long strips of colored paper   2. A piece of hard paper   3. Double-sided tape

Step by step tutorial :

1. First, we use a long strip of colored paper to fold a pentagon. 

2. Extrude the pentagon to the thickness. form a star. 


3. Roll it into a cone with cardboard.   

4. Cover and paste the double-sided tape along the bottom of the cone.   

5. Paste the previously made stars on the cone one by one.  6. Now our star Christmas tree is ready.

The following link is a detailed video tutorial, I hope you like it.

DIY Christmas Star Tree Video Tutorial


More DIY crafts HERE.

Sharing is Caring:

DIY Yarn Balloon Snowman tutorials

In my memory, everyone likes to build snowmen when it snows in winter. Our snowman is generally composed of two to three snowballs of different sizes. Usually, the smaller one is placed on top of the larger one to form a human shape, and a scarf, hat or coat button is attached to make it more human-like. Sometimes, buckets, brooms, carrots, etc. are used as decorations to make it more cute. However, some warm places do not snow in winter, such as most places in California, Christmas is not perfect without a snowman. Moreover, the snowman doesn’t last long, and it melts when the temperature is high, so how to make a snowman that won’t melt? The answer is that we DIY our own snowmen from materials that won’t melt. Here are two DIY Yarn Balloon Snowman tutorials, let’s go through them, and make Christmas more fun. First we need to add 2 parts PVA and 1 part water to a bowl and mix together to blow up the balloon. Put the wool in the glue mixture and wrap it around the balloon. Repeat the previous steps to make the snowman’s head and body separately. Finally glued together. Then use some decorations for the snowman’s eyes, mouth, etc. Let’s follow the tutorial and make it step by step. Both tutorials are easy to follow, and in no time you’ll be able to make really cute snowmen. Thanks to Hallmarkchannel and Bakerross for the great DIY Yarn Balloon Snowman tutorials. The details is linked below the picture, Have fun!

You may also like:  DIY-cute-owl-out-of-recycled-paper-bag

This DIY snowman tutorial is link here:

Click HERE for DIY Balloon Yarn Snowman tutorial 1

This DIY snowman tutorial is link here:

Click HERE  for DIY Balloon Yarn Snowman tutorial 2

Sharing is Caring:

DIY Cute Owl Out of Recycled Paper Bag

The ancient Greeks revered the owl as a symbol of Athena and wisdom. In Japan, the owl is called the bird of luck, and has also become the mascot of the Nagano Winter Olympics, representing good luck and happiness. Today we are going to learn how to DIY Cute Owl out of recycled paper bags. This DIY project is also great for kids, I think they will have a great time!

You may also like: Easy-diy-paper-rose-tutorial

For make this DIY cute owl , what you will need:

2 recycled paper bags, colored papers, scissors, pens, glue

The step-by-step tutorial is as follows:

1. First we prepare a recycled paper bag, you can choose the most common paper bag. And cut off the handle of the paper bag. 

2. We prepare a piece of yellow paper, use scissors to cut out a shape similar to an eye patch, and use white paper to cut out a shape similar to a gear. 

3. Continue to use blue paper and pink paper to cut into circles. 

4. On the pink circle, draw the shape of a closed eye. 

5. Use all kinds of colored paper, cut it into a circle, fold it in half and put it under the paper bag as the owl’s feathers. And fold out a triangle for the owl’s beak. Take another paper bag and use scissors to cut out the owl’s ears. 

6. Use scissors to cut out the shape of the owl’s wings, and draw the pattern of feathers on it. Here you can play your personality freely. 

7. Put all parts in the proper position. 

8. Make the owl’s feet at the bottom. Such a recycled paper bag owl is complete. Do you like it?

Sharing is Caring:

Easy DIY Paper Rose Tutorial

I like roses very much, I like all kinds of roses. How about you? Today we are going to share a tutorial on folding roses. They are so pretty that they can be decorated at home without worrying about them dying. Let’s get started now.

For Easy DIY Paper Rose project, what you will need: square paper, paper cup and glue.

1. First we prepare an 8 OZ paper cup, cut the bottom and put it upside down on the table.


2. Then prepare 30 pieces of colored square paper, the size of the paper is 5.5 x 5.5cm. You can choose the color you like. We first take a piece of paper and fold it in half along the diagonal line once and we will get a triangle. Then put it Open and clamp it to the edge of the paper cup.


3. We repeat the above steps, and fill the triangular paper along the paper cup.


4. To apply glue to the bottom of the paper, put the triangular paper one by one, and repeat this step until all the paper is used up.
5. Turn the paper cup upside down, then you can see a flower, remove it from the paper cup.


Now, a beautiful rose is ready.

We can make many rose flowers, put them in vases or wrap them up as gifts. Do you like it?

You may also like: DIY Paper Rainbow Umbrella Tutorial

Sharing is Caring: