Category Archives: Kids Crafts

How to DIY Adorable Origami Strawberry

Origami, the art of paper folding, is not only a relaxing and creative activity but also allows you to create beautiful objects with just a few simple folds. Among the myriad of origami designs, the origami strawberry stands out as a delightful and charming creation. In this essay, we will explore how to create your very own adorable origami strawberry in just a few easy steps.

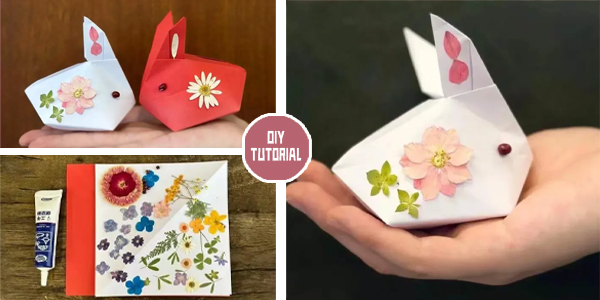
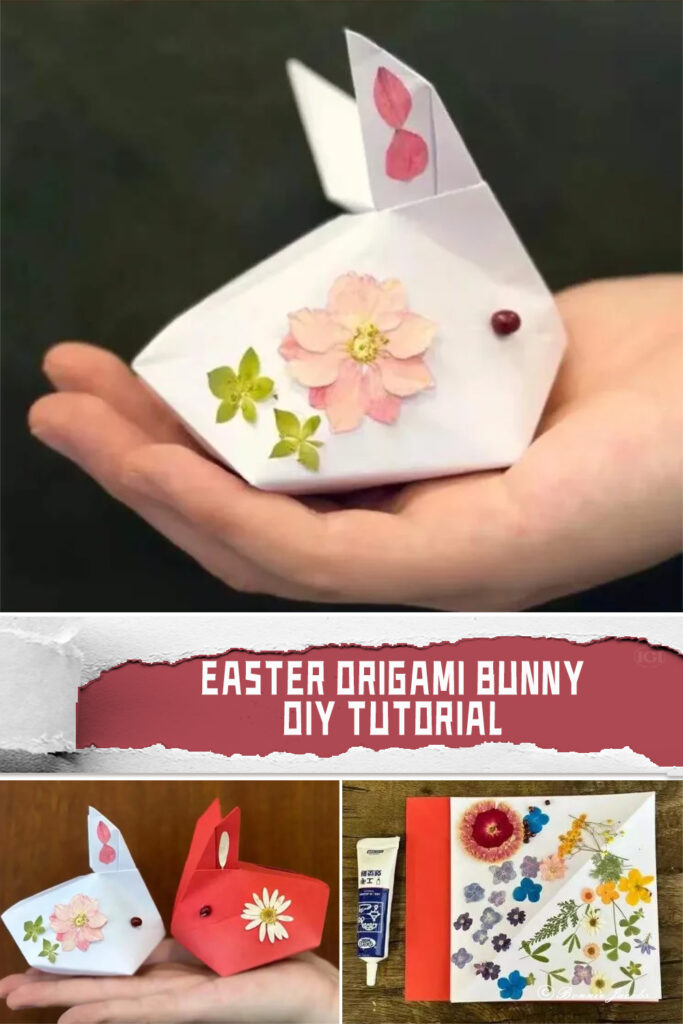
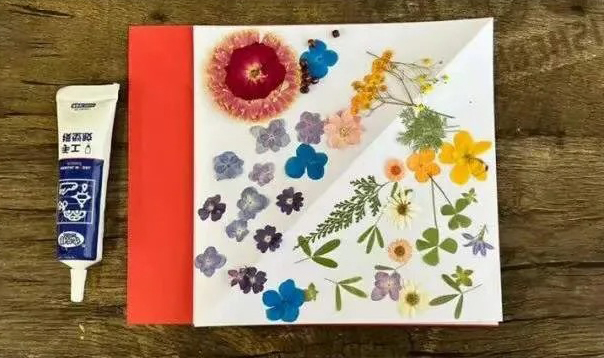
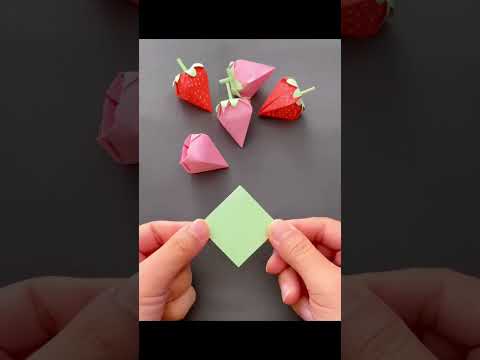
Firstly, gather your materials. You will need a sheet of pink colored paper for the main body of the strawberry. This will form the fleshy part of the fruit. Next, prepare a smaller sheet of green paper for the leaves and another green sheet to roll into the stem.

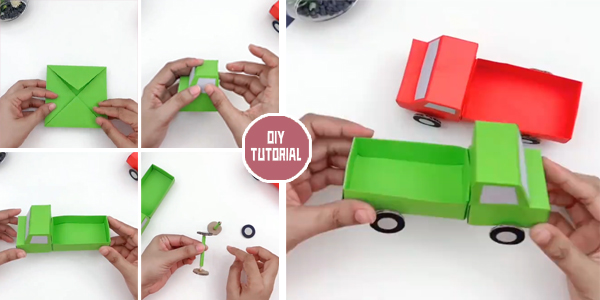
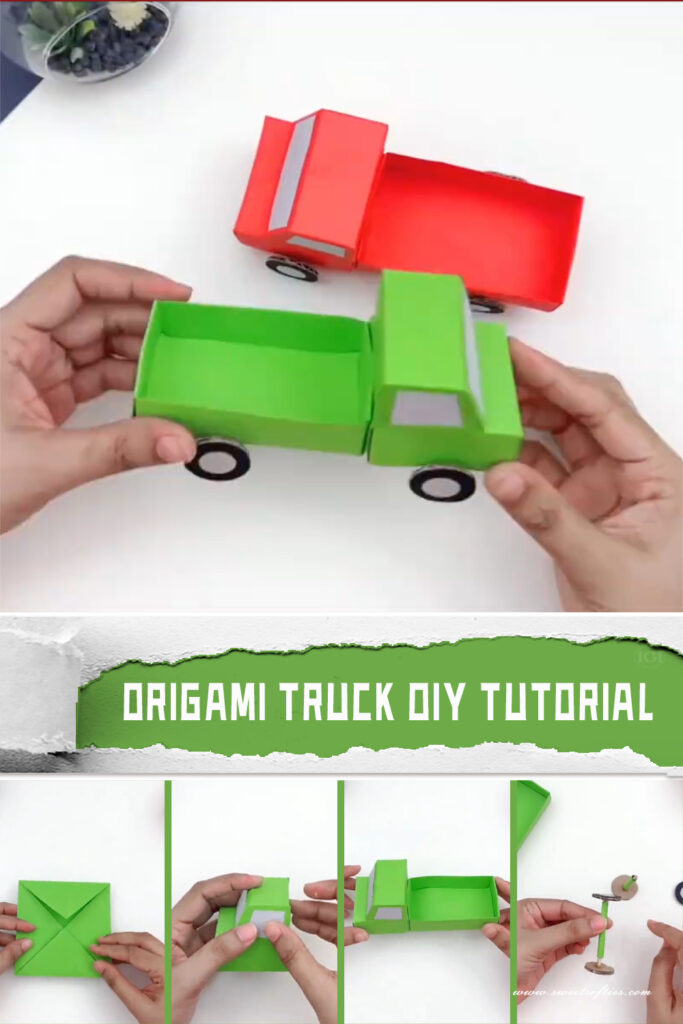
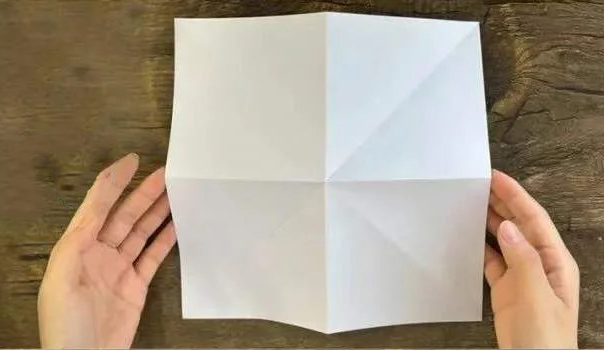
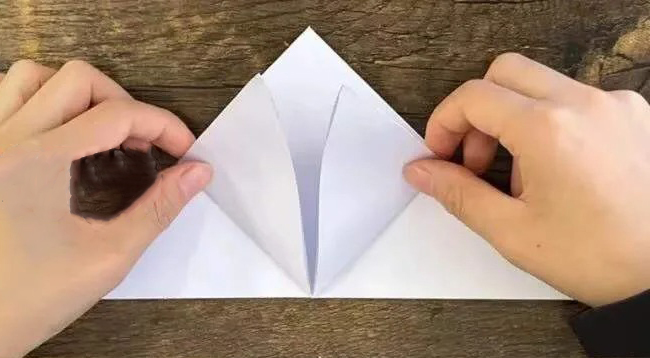
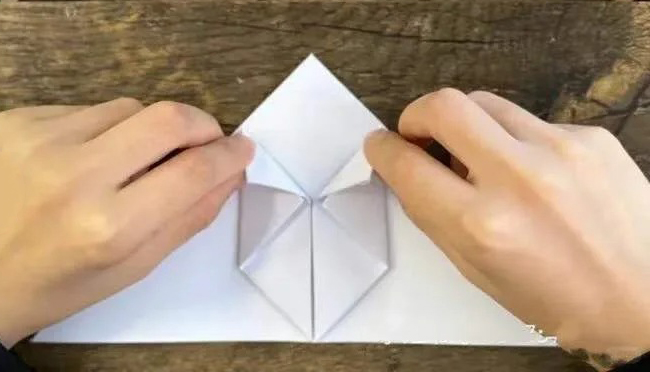
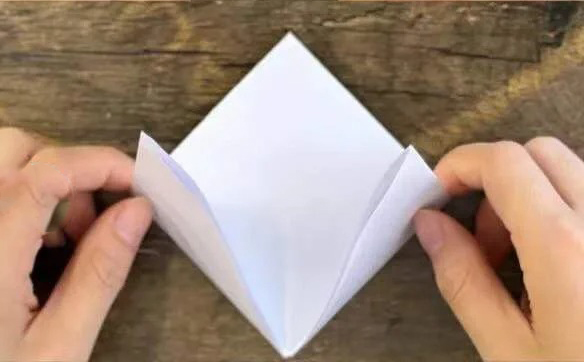
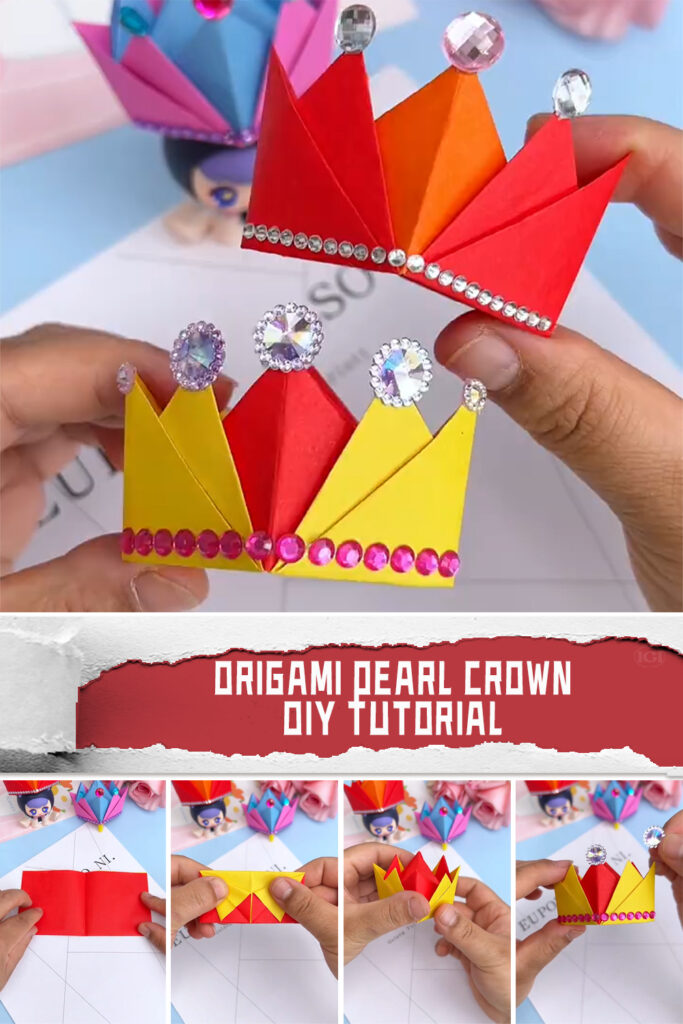
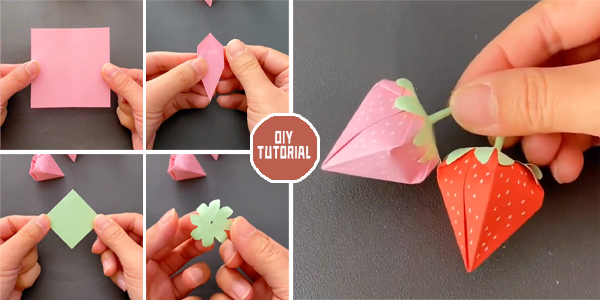
1..Begin by following the instructions in the provided video to fold the pink paper into the shape of the strawberry’s fleshy segments. Pay close attention to each fold to ensure accuracy and precision. This step forms the core of the strawberry.

2. Next, take the smaller green paper and carefully cut it into leaf shapes according to the instructions in the video. These will serve as the strawberry’s leaves, adding a realistic touch to your creation.

3. Now, take the third sheet of green paper and roll it into a thin tube to create the stem of the strawberry. This step adds dimension and detail to your origami fruit.

4. Finally, using a dab of glue, carefully attach the segments, leaves, and stem together to form your completed origami strawberry. Take your time with this step to ensure everything is securely fastened.

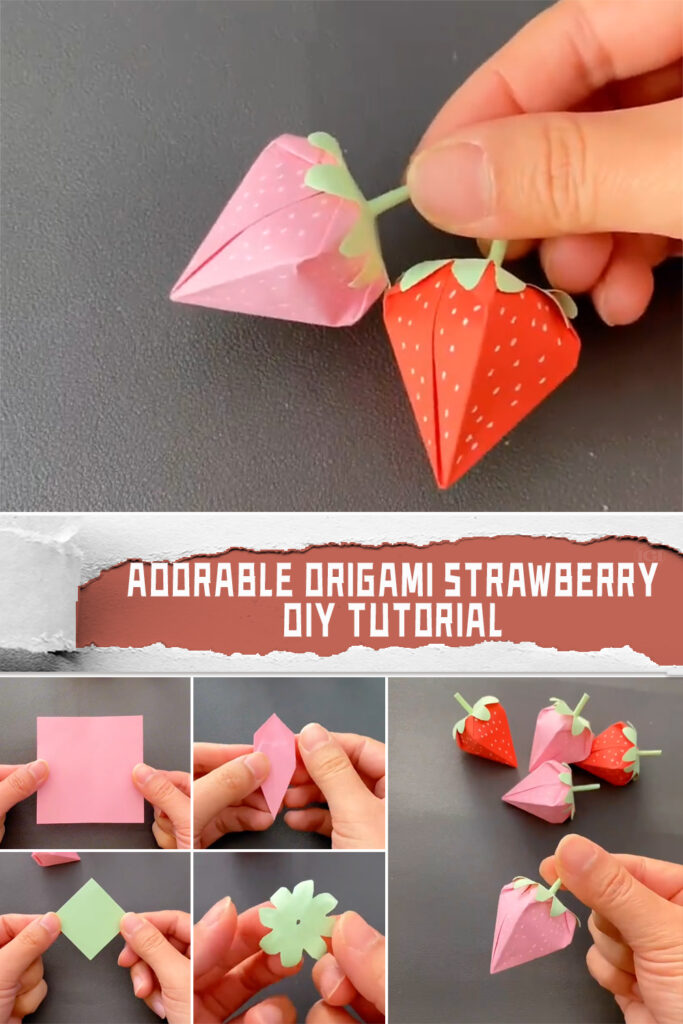
And there you have it – a fun and adorable origami strawberry! Display it proudly or give it as a charming gift to brighten someone’s day. Enjoy the process of creating your own little piece of fruity art through the ancient craft of origami.

YOU MAY ALSO LOVE: 6 FREE Sweet Crochet Strawberry Patterns

FREE Crochet Strawberry Blanket Patterns

Sharing is Caring:

DIY Origami Truck Tutorial

Origami, the ancient art of paper folding, has long captivated enthusiasts with its simplicity and beauty. With just a few folds and creases, ordinary pieces of paper can be transformed into intricate designs, including animals, flowers, and even vehicles. In this essay, we’ll explore a step-by-step tutorial for creating a charming origami truck, a delightful project for both beginners and seasoned paper crafters.

Step by step tutorial for  DIY Origami Truck:

1. To begin this DIY origami truck tutorial, gather two sheets of paper and follow the folding instructions demonstrated in the accompanying video. First, fold one sheet to create the truck’s cab, carefully shaping it to resemble the front of a truck.

2. Next, using glue and additional paper, smooth out any rough edges on the cab and attach paper cutouts to form windows, adding detail and realism to the design.

3. Moving on to the truck’s body, take the second sheet of paper and fold it according to the techniques shown in the tutorial. Pay attention to the folds and creases, as they will determine the shape and proportions of the truck’s cargo area.

4. Once both the cab and body are folded, secure them together using glue, ensuring a sturdy connection between the two components.

5. Now, for the finishing touches, create axles for the truck’s wheels by rolling strips of paper into cylindrical shapes. Cut out circular pieces of stiff paper to serve as the wheels, then attach them to the axles with glue.

6. Finally, affix the wheels to the truck’s body, positioning them evenly for balance and stability. With all the components in place, your origami truck is now complete, ready to be admired and played with.

Video tutorial for DIY Origami Truck:

In conclusion, this DIY origami truck tutorial offers a delightful way to explore the art of paper folding while creating a fun and whimsical toy. Through simple folds and a bit of creativity, ordinary sheets of paper are transformed into a charming miniature truck, showcasing the endless possibilities of origami as a form of creative expression. So why not grab some paper and glue, follow along with the tutorial, and embark on your own origami adventure?

YOU MAY ALSO LOVE: Crocheted Red Truck FREE Crochet Patterns

DIY Easter Origami Bunny Tutorial

Sharing is Caring:

DIY Easter Bouncing Rabbit Tutorial

With the arrival of Easter, it’s the perfect time to indulge in some creative crafting to usher in the spirit of spring. If you’re looking for a fun and easy project to add a touch of whimsy to your Easter decorations, look no further than this DIY Easter Bouncing Rabbit tutorial. With just a few simple materials and easy-to-follow steps, you can create adorable bouncing rabbits that are sure to bring joy to your home.

To get started, gather the following materials: white paper, scissors, colored markers, and glue.

Step by step tutorial for DIY Easter Bouncing Rabbit:

1. Begin by taking two rectangular pieces of white paper and folding them together. These folded papers will serve as the base for your bouncing rabbit.

2. Next, start twisting the folded paper strips continuously to form a spring-like shape. This will be the body of your bouncing rabbit, providing it with the playful bounce that gives it its charm.

3. Now, take another piece of white paper and cut it into a slightly oval shape to create the rabbit’s face. Use colored markers to draw on the rabbit’s eyes, nose, mouth, and any other facial features you desire.

4. Using scissors, carefully cut out two ear shapes from the white paper. These will serve as the rabbit’s ears, adding an extra element of cuteness to your creation.

5. Once you have all the components ready, it’s time to assemble your bouncing rabbit. Use glue to attach the rabbit’s face to the spring-shaped body, making sure to align it properly for a charming look. Then, glue the ears onto the top of the rabbit’s face, securing them in place.

And there you have it – your DIY Easter Bouncing Rabbit is complete! Place it on your mantel, dining table, or any other surface where it can bring a smile to everyone’s face. You can make multiple rabbits in different sizes and colors to create a delightful Easter display that will brighten up any room.

Here is the video tutorial:

In conclusion, this DIY Easter Bouncing Rabbit tutorial offers a fun and creative way to celebrate the season and add a touch of whimsy to your Easter decor. With just a few simple materials and easy steps, you can craft adorable bouncing rabbits that will delight both young and old alike. So gather your supplies and get ready to hop into some Easter crafting fun!

YOU MAY ALSO LOVE: 8 Easter Bunny Bag FREE Crochet Patterns

Easter Bunny Blanket FREE Crochet Patterns

Sharing is Caring:

DIY Easter Origami Bunny Tutorial

Origami, the ancient Japanese art of paper folding, offers endless possibilities for creating beautiful and intricate designs with just a simple piece of paper. In this tutorial, we will explore how to make an adorable DIY Easter Origami Bunny  , perfect for Easter decorations or as a delightful handmade gift. With just a few folds and a touch of creativity, you can bring this charming bunny to life.

To begin, gather the necessary tools: square paper, dried flowers (optional for decoration), and glue.

Step by step tutorial for  DIY Easter Origami Bunny:

1. Start by preparing your square paper and laying it flat on a clean surface.

2. Fold the paper diagonally to create a triangle, creasing along the fold to mark the center.

3. Fold the left and right corners of the triangle towards the center, forming two smaller triangles at the bottom.

4. Take the bottom corners of the two smaller triangles and fold them backward, creating a pointed shape.

5. Next, fold the top point of the triangle downwards, creasing it firmly.

6. Fold the two side corners of the triangle inwards, aligning them with the center crease.

7. Tuck the folded corners into the slots created by the previous folds, securing them in place.

8. Flip the paper over and fold the bottom corners of the triangle upwards, creating the bunny’s feet.

9. Fold the top point of the triangle downwards once again, shaping it into the bunny’s head.

10. Using the creases as a guide, fold the bunny’s ears outward, giving them a cute and floppy appearance.

11. Finally, add a touch of whimsy to your origami bunny by decorating it with dried flowers or other embellishments. Simply apply a small amount of glue to the desired area and carefully attach the decorations.

Voila! Your DIY Easter origami bunny is complete, ready to bring joy and charm to any Easter celebration or decoration. This simple yet delightful craft is sure to impress with its intricate folds and playful design. So gather your materials, unleash your creativity, and enjoy the satisfying process of creating your very own origami masterpiece. Happy folding!

YOU MAY ALSO LOVE: DIY Origami Mini Tote Bag Tutorial

DIY Origami Pearl Crown Tutorial

Sharing is Caring:

DIY Happy Swinging Bunny Tutorial

Are you ready to embark on a delightful crafting journey? Let’s dive into creating a Happy Swinging Bunny! With just a few simple materials and a touch of creativity, you can bring this adorable bunny to life and add a sprinkle of joy to any space. Follow along with these step-by-step instructions to craft your own charming swinging bunny decoration:

1. To begin, gather a circular piece of cardstock. Fold it neatly in half, forming a perfect semi-circle. This will serve as the base of your swinging bunny’s crib, providing stability and support for the whimsical creation to come.

2. Now, it’s time to fashion the bunny’s head. Take another circular piece of cardstock and carefully cut out the shape of bunny ears from a fresh sheet of cardstock. These ears will give your swinging bunny its distinctive charm and personality.

3. For the bunny’s hands, use two small circular pieces of cardstock. These will be attached to the swinging mechanism, allowing your bunny to playfully sway back and forth.

4. With the basic structure in place, it’s time to add some color and character to your swinging bunny. Grab a paintbrush and gently brush on vibrant hues to the bunny’s ears, infusing them with life and vibrancy. Then, affix eyes, a cute little nose, and any other decorative elements you desire to give your bunny its unique flair.

5. To complete the look, adorn the semi-circle cardstock base with whimsical plant decorations. Whether it’s colorful flowers, lush greenery, or tiny mushrooms, these additions will elevate your swinging bunny’s charm and create a delightful scene for it to inhabit.

Voila! With a few simple steps, your DIY Happy Swinging Bunny is ready to spread joy and cheer wherever it goes. Hang it in a nursery to enchant little ones, display it in a cozy corner of your home to brighten up your day, or gift it to a loved one as a token of your affection. Get creative with colors, patterns, and decorations to make your swinging bunny truly one-of-a-kind. Enjoy the process of crafting and let your imagination run wild as you bring this charming creation to life!

Here is the video tutorial for  DIY Happy Swinging Bunny:


YOU MAY ALSO LOVE:   DIY Christmas Star Tree Tutorial

DIY Easter Paper Chicken Egg Tutorial

Sharing is Caring:

DIY Origami Pearl Crown Tutorial

Origami, the ancient Japanese art of paper folding, has captivated hearts and minds for centuries with its simplicity and beauty. From delicate cranes to intricate flowers, origami offers endless possibilities for creativity and expression. In this tutorial, we will explore how to create a stunning origami pearl crown, combining the elegance of pearls with the timeless charm of origami.

Materials Needed for DIY Origami Pearl Crown:

Square paper (preferably pearl or metallic finish)
Pearls or pearl stickers
Glue (if using loose pearls)
Scissors (optional)
Ruler (optional)

Instruction:

Step 1: Choose Your Paper
Select a square sheet of paper in a color and finish of your choice. Pearl or metallic finish papers work well for creating an elegant crown with a touch of shimmer and sophistication.

Step 2: Fold the Paper
Start by folding the square paper diagonally to form a triangle. Ensure that the edges align perfectly to create a crisp fold.

Step 3: Create Base Folds
Fold the bottom corners of the triangle up to the top corner, creating two smaller triangles. This will serve as the base for your crown.

Step 4: Fold the Side Edges
Fold the left and right edges of the triangle towards the center crease, creating two additional smaller triangles along the sides.

Step 5: Flip and Fold Again
Flip the paper over and fold the bottom edge up towards the top edge, aligning it with the existing crease. This will create a narrow strip of paper along the bottom edge of the crown.

Step 6: Fold Downward
Fold the top layer of the narrow strip downwards, tucking it under the layers of paper to secure it in place. This will form the band of the crown.

Step 7: Decorate with Pearls
Now it’s time to add the finishing touches to your origami pearl crown. If using loose pearls, apply a small dab of glue to the crown and carefully place the pearls in your desired pattern or design. Alternatively, you can use pearl stickers for a quick and mess-free application.

Step 8: Let Dry (If Necessary)
Allow the glue to dry completely before wearing or displaying your origami pearl crown. Once dry, gently adjust the shape of the crown as needed to achieve the desired look.

Step 9: Wear with Pride
Your stunning origami pearl crown is now complete! Wear it with pride for special occasions such as weddings, parties, or photo shoots, or display it as a decorative accent in your home.

Here is the video tutorial for DIY Origami Pearl Crown:

In conclusion, crafting a DIY origami pearl crown offers a delightful blend of creativity and elegance, allowing you to create a one-of-a-kind accessory that is sure to turn heads and spark conversation. Whether you’re a seasoned origami enthusiast or new to the art form, this tutorial provides a simple yet stunning project that anyone can enjoy. So gather your materials, unleash your creativity, and prepare to craft a crown fit for royalty!

YOU MAY ALSO LOVE: 6 Knitted Crown Free Patterns

DIY Origami Mini Tote Bag Tutorial

Sharing is Caring:

DIY Easter Paper Chicken Egg Tutorial

Are you looking for a fun and creative Easter craft project? Look no further! With just a few simple materials, you can create adorable DIY Easter Paper Chicken and eggs to decorate your home for the holiday. Here’s a step-by-step tutorial to guide you through the process:

Materials Needed for DIY Easter Paper Chicken:

Disposable paper plate
Raffia
White cardstock
Colored cardstock
Feathers
Scissors
Permanent marker

Instructions:

1. Start by drawing a cute chicken shape on the white cardstock.
2. Use scissors to carefully cut out the chicken shape.
3. Next, draw several egg shapes on the colored cardstock.
4. Cut out the egg shapes with scissors.
5. Draw a small chick shape on the colored cardstock.
6. Cut out the chick shape with scissors.
7. Draw a circle on a piece of paper and cut it in half (creating a semicircle).
8. Use the semicircle to cover the front of the disposable paper plate.
9. Insert the chicken, chick, eggs, and raffia into the semicircle and the paper plate.
10. Make two holes in the back of the paper plate and thread a thin string through them.
11. Your lovely Easter paper chicken egg decoration is now complete!

This  DIY Easter Paper Chickenproject is perfect for kids and adults alike. You can customize your paper chickens and eggs with different colors and patterns to suit your Easter decor theme. Whether displayed as table centerpieces or hung as festive decorations, these charming creations are sure to add a touch of whimsy to your Easter celebrations. So gather your materials and get ready to craft your way to a hoppy Easter!

You may also love: Christmas Booties Free Crochet Patterns

DIY Easter Paper Plate Egg Tutorial

Sharing is Caring:

DIY Easter Paper Plate Egg Tutorial

Looking for a fun and easy Easter craft activity? Why not try making these adorable Easter Paper Plate Eggs? Follow these simple steps to create your own festive decorations.

Materials you will need :

Paper plates
Yellow oval-shaped cardstock
Scissors
Glue
Markers or googly eyes
Colorful paper circles or stickers

Instructions:

1. Start by drawing zigzag lines on the paper plate to resemble the cracked shell of an egg.

2.Use scissors to carefully cut along the zigzag lines, creating a jagged edge around the paper plate.

3.Take a yellow oval-shaped piece of cardstock and glue it onto the paper plate to cover the center.

4.Next, use markers or googly eyes to decorate the yellow cardstock with chicken eyes, a beak, and any other facial features you like.

5. To add some extra flair, glue on colorful paper circles around the edges of the paper plate to represent Easter decorations.

Voila! Your Easter Paper Plate Egg is complete and ready to display. Hang it up as a festive decoration or use it as a unique Easter-themed serving platter for treats and snacks.

This  DIY Easter Paper Plate Egg craft is perfect for kids and adults alike, providing a fun and creative way to celebrate the Easter holiday. Get together with friends and family to make a whole flock of these cute Easter Paper Plate Eggs and spread joy and cheer throughout your home. Happy crafting!

YOU MAY ALSO LOVE: 8 Easter Bunny Egg Cozy Knitting Patterns – FREE

DIY Paper Plate Bunny Tutorials

Sharing is Caring:

DIY Concrete Easter Candles Tutorial

Looking for a unique and creative way to celebrate Easter? Why not try making your own DIY Concrete Easter Candles? With just a few simple materials and some easy steps, you can create beautiful candles that will add a touch of charm to your Easter decor. Here’s how to do it:

Materials Needed for DIY Concrete Easter Candles:

Eggs
Concrete mix
Toothpicks
Candle wicks
Candle wax (soy wax, beeswax)

Step by step tutorial:

1. Start by carefully hollowing out the eggs, leaving only the eggshells intact. Be gentle to avoid breaking the shells.

2. Mix the concrete according to the ratio of water to concrete (100:45). Once mixed thoroughly, pour the concrete into the hollowed-out eggshells. Allow them to dry for at least 12 hours.

3. Prepare your candle wax by melting it in a double boiler or by using a microwave. If using a combination of soy wax and beeswax, melt them together in a 1:1 ratio and allow the mixture to cool slightly.

4. Attach the candle wicks to toothpicks and place them in the center of each concrete-filled eggshell, using the toothpicks to support the wicks upright.

5. Carefully pour the melted candle wax into each eggshell, ensuring that the wicks remain centered. Allow the wax to cool and solidify completely.

6. Once the wax has hardened, gently crack and remove the eggshells to reveal your beautifully crafted Easter candles.

Here is the video tutorial for DIY Concrete Easter Candles:

These DIY concrete Easter candles are not only a fun project to make, but they also make for lovely decorations or gifts during the Easter season. So gather your materials and get creative this Easter!

YOU MAY ALSO LOVE:  10+ Knitted Flower Free Patterns

DIY Christmas Star Tree Tutorial

Sharing is Caring:

Adorable Easter Basket DIY Tutorial

Easter is a time of renewal, joy, and celebration, and what better way to embrace its spirit than by crafting your very own Easter basket? This DIY tutorial will guide you through the simple steps to create a charming basket that will be perfect for gathering eggs or displaying festive treats.

To begin, gather a square piece of paper and fold it into nine equal sections, with three folds along each side, as shown in Figure 1. Next, carefully cut along the indicated red lines, dividing the paper into smaller segments (Figure 2). These segments will form the base and sides of your basket.

Now, take sections 1, 3, 7, and 9, and cut each into four equal parts (Figure 3). These will be used to construct the sides of the basket. Following the folding pattern illustrated in Figure 4, fold along the lines to create creases on both sides of the paper.

Using the folding technique depicted in Figure 5, begin to shape the sides of the basket by folding the paper upwards. Repeat this step on all four sides to form the basket’s structure. Secure the folded sections together using glue, ensuring a sturdy hold (Figures 6-9).

Repeat the folding and gluing process on the other half of the paper to complete the basket’s construction (Figure 10). Once both halves are secured, adorn the seams with decorative flowers or embellishments to cover any visible overlap of paper strips (Figure 11).

Finally, craft a handle for your basket using a long strip of paper. Attach the handle to opposite sides of the basket, ensuring it is securely fastened and balanced.

Here is the Video for Easter Basket DIY Tutorial :

Your homemade Easter basket is now ready to be filled with colorful eggs, chocolates, or any other festive treats of your choice. Whether displayed as a centerpiece or used for an Easter egg hunt, this DIY creation adds a personal touch to your holiday celebrations, making them even more memorable and enjoyable for all involved.

YOU MAY ALSO LOVE: DIY Origami Mini Tote Bag Tutorial

10 Easter Bunny FREE Crochet Patterns

Sharing is Caring:

DIY Easter Bunny that Runs (Video Tutorial)

DIY projects often bring out the creative side in us, and what could be more delightful than making your own DIY Easter Bunnythat not only looks cute but also runs! With just a few simple materials, you can create a charming little bunny that will hop its way into everyone’s hearts.

YOU MAY ALSO LOVE: 5 Easter Bunny Keychain Crochet Patterns – FREE

DIY Easter 3D Egg Template

DIY Paper Plate Bunny Tutorials

To start off, gather the materials you’ll need: a disposable paper cup, some pieces of paper, a rubber band, two bottle caps, and transparent tape.

1. Begin by drawing the adorable features of a bunny on the paper cup. Think of cute eyes, a little nose, and a happy smile to give your bunny character.
2. Next, cut out small pieces of paper to use as the bunny’s rosy cheeks and draw whiskers on them. Attach these to the sides of the paper cup.
3. Now, create the bunny’s ears using more paper. Attach them to the bottom of the paper cup, positioning them to look like bunny ears.
4. Take the two bottle caps and glue them together to form the bunny’s wheels.
5. . Insert the glued bottle caps into the rubber band, and then wrap a strip of transparent tape around the circumference of the caps to ensure they spin smoothly.
6. Use scissors to cut the top of the paper cup and fold it upwards slightly. Wrap the rubber band and bottle caps assembly around the cup.
7. Now, the fun part! Start rotating the rubber band and watch as your little bunny begins to run on its wheels. Adjust the tension of the rubber band to control the speed of your bunny’s run.

With a few simple steps and a bit of imagination, you’ve created your very own DIY Easter Bunny that not only looks adorable but also has a playful trick up its sleeve. This DIY project is not only fun to make but also a delightful addition to any Easter celebration, bringing joy and laughter to all who witness the bunny’s charming run.

Sharing is Caring:

DIY Paper Plate Bunny Tutorials

In the realm of children’s crafts, simplicity often reigns supreme, and the paper plate bunny craft epitomizes this principle. Leveraging common household materials and a touch of creativity, these tutorials transform humble paper plates into adorable Easter bunnies, igniting imagination and fostering hands-on engagement for young crafters. Here we will explore two DIY Paper Plate Bunny Tutorials . Both tutorials share a common goal beyond mere craft-making: fostering quality bonding experiences between parents and children. The collaborative nature of these projects encourages communication, teamwork, and shared problem-solving—a trifecta of skills crucial for healthy familial relationships and children’s overall development.We extend our heartfelt gratitude to all the talented designers who generously shared these DIY Paper Plate Bunny Tutorials, allowing crafters to bring their creative visions to life. To access these delightful tutorials, simply scroll down the page and click on the links provided below the pictures. Happy crafting!

You may also love: Easy DIY Paper Rose Tutorial

DIY Valentine Paper Wreath Tutorials

1. The first tutorial, hosted on “Mommy Made That,” offers a step-by-step guide accompanied by vibrant visuals, ensuring accessibility for both parent and child. The materials list is refreshingly uncomplicated, featuring essentials like paper plates, paint, and scissors. This simplicity not only streamlines the crafting process but also encourages resourcefulness and adaptability, qualities beneficial for children’s cognitive development.

Moreover, the tutorial emphasizes customization, empowering children to infuse their personalities into each bunny creation. From selecting paint colors to embellishing with googly eyes and cotton balls, every step invites creative expression, nurturing individuality and boosting confidence. Through this interactive approach, children not only produce tangible artworks but also cultivate their artistic identity—a priceless outcome of the crafting experience.

1. Click here to get this DIY Bunny Tutorial

2. On the other hand, the second tutorial, hosted on “Simply Today Life,” offers a slightly different perspective while maintaining the core essence of simplicity and creativity. Clear instructions complemented by insightful tips ensure smooth execution, catering to varying skill levels and fostering a sense of accomplishment regardless of expertise. Additionally, the incorporation of printable templates adds an extra layer of convenience, easing the crafting process and reducing potential barriers to participation.

2. Click here to get this DIY Bunny Tutorial

In conclusion, the paper plate bunny DIY tutorials exemplify the beauty of simplicity, creativity, and togetherness in children’s crafting. By leveraging household materials and encouraging personalization, these tutorials transcend mere art projects, becoming catalysts for joyful exploration and meaningful connections in the realm of family creativity.

Sharing is Caring: