All posts by igoodideas

FREE Crocket / Knitting Patterns... and DIY

Sunflower Baby Hat FREE Crochet Pattern

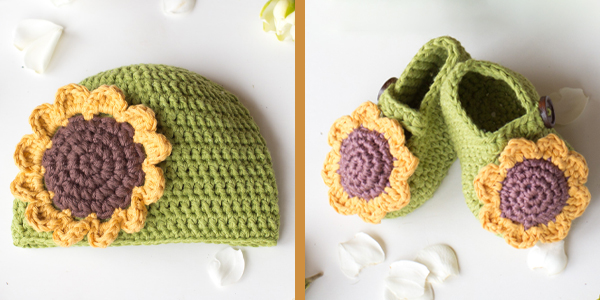
I stumbled across this Sunflower Baby Hat crochet tutorial today and couldn’t help but catch my eye. It takes the shape and color of a sunflower, which is bright and lovely. Sunflower means silent love. Sunflowers will gradually turn the flower disk to the direction of the rising sun every morning. After the sun rises, it will bloom, and then with the movement of the sun, it will constantly change the direction of the flower disk, always looking at the sun, Just like the love of parents, but it will not trouble her. Such meaningful graphics, like parents give their children the best and most selfless care. In terms of color, green symbolizes vitality and vigor; yellow symbolizes maturity and harvest. It also represents the meaning of the child’s growth.

This Sunflower Baby Hat would be a great gift for any little one. The overall shape and color give people a warm feeling. It will add some personality to your little one’s wardrobe! Charming and sweet, the bright petals will warm up any day. Thanks to hopefulhoney for sharing the free pattern with us, you can find the link below the image.

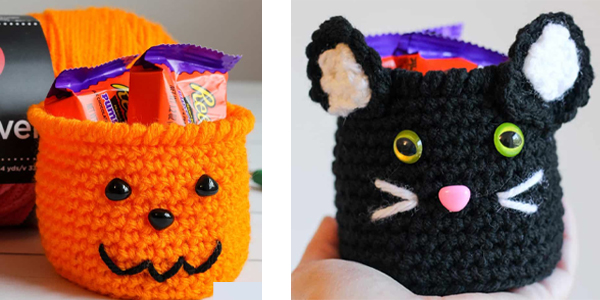
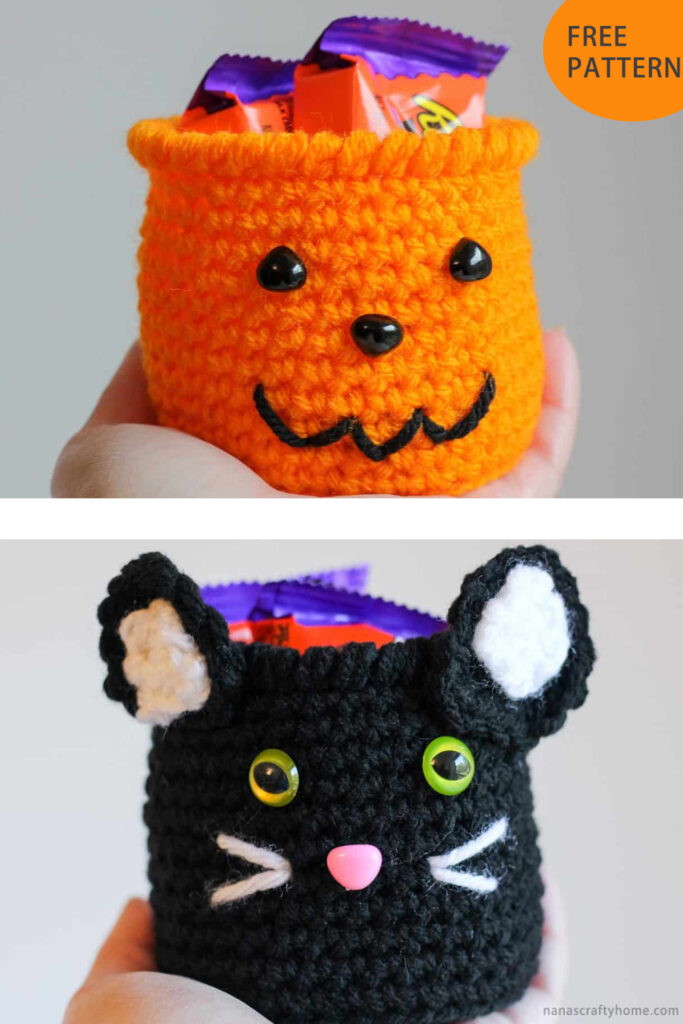
You may also like: Pumpkin & Black Cat Basket Free Crochet Patterns

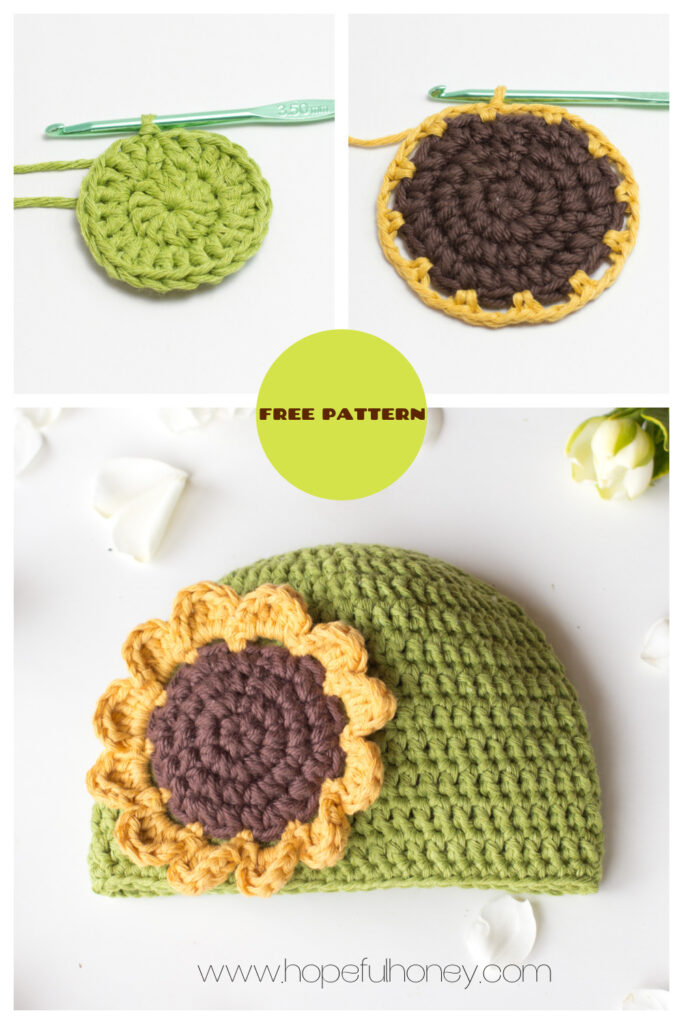
The full article about this FREE pattern is here:

Sunflower Hat FREE Crochet Pattern

If you want to complete a floral hat and booties set, you can find a PAID crochet pattern for these cute sunflower booties here:

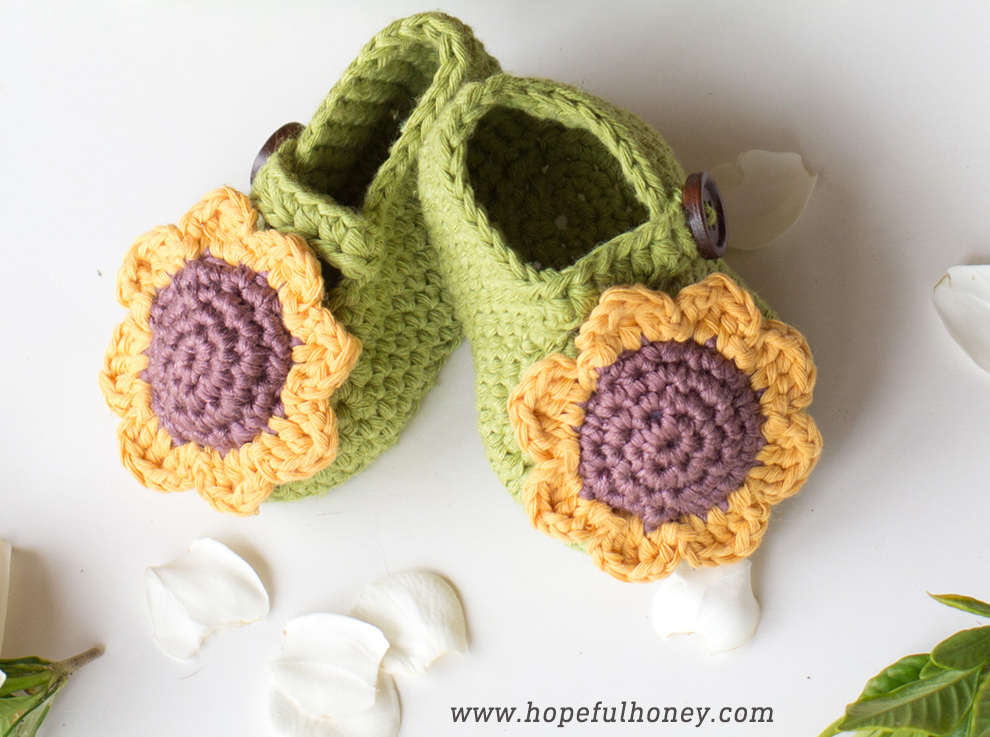
Sunflower Booties Paid Pattern

Sharing is Caring:

Pumpkin & Black Cat Basket Free Crochet Patterns

For me, pumpkins are the perfect fall decoration, and black cats are an indispensable Halloween addition. Today I had the pleasure of admiring this pumpkin and black cat basket crochet project! Many thanks to Tonya for sharing the free pattern with us. Also, she provides an ad-free, printable PDF for everyone.

These crochet pumpkin and black cat baskets is very cute and quick to make. Not only can they be used to decorate a room, but they can also make great gifts. First, you need to follow the free pattern provided by Tonya to make the basket, and then add some decorations. Pumpkin needs three triangular safety noses and an embroidered mouth, black cats need to use two safety cat eyes, safety nose, embroidered whiskers and crocheted ears, sewn to the outside of the cup top. Also, you can make pumpkins or cats different colors, and then fill them with candy or trinkets for a fun little surprise for someone! In our life, there are many beautiful things worth discovering, we should use our hands to create more beautiful things! Free crochet patterns are linked below the image, happy crocheting!

You may also like: Easy DIY Paper Rose Tutorial

Click the link for Pumpkin & Black Cat Basket FREE crochet pattern:

Pumpkin & Black Cat Basket Free Crochet Patterns

Sharing is Caring:

Easy DIY Paper Rose Tutorial

I like roses very much, I like all kinds of roses. How about you? Today we are going to share a tutorial on folding roses. They are so pretty that they can be decorated at home without worrying about them dying. Let’s get started now.

For Easy DIY Paper Rose project, what you will need: square paper, paper cup and glue.

1. First we prepare an 8 OZ paper cup, cut the bottom and put it upside down on the table.


2. Then prepare 30 pieces of colored square paper, the size of the paper is 5.5 x 5.5cm. You can choose the color you like. We first take a piece of paper and fold it in half along the diagonal line once and we will get a triangle. Then put it Open and clamp it to the edge of the paper cup.


3. We repeat the above steps, and fill the triangular paper along the paper cup.


4. To apply glue to the bottom of the paper, put the triangular paper one by one, and repeat this step until all the paper is used up.
5. Turn the paper cup upside down, then you can see a flower, remove it from the paper cup.


Now, a beautiful rose is ready.

We can make many rose flowers, put them in vases or wrap them up as gifts. Do you like it?

You may also like: DIY Paper Rainbow Umbrella Tutorial

Sharing is Caring:

DIY Flower Baskets from Recycled Paper Cups

Don’t throw away the leftover yarn and paper cups, we can recycle these items to make flower baskets. These beautiful flower baskets can decorate our room and can also be used to grow flowers and plants. Let’s get started now!

1. First, we take a paper cup and cut it with scissors on the paper cup. 
2. Cut the paper cup into long strips.
3. Cut the whole paper cup into a circle. 
4. Wrap the bottom of the cup with double-sided tape. 
5. Using your favorite colored yarn, wrap it around the double-sided tape on the bottom of the cup. 


6. Keep winding, pay attention when winding into strips, and each strip should cross each other. 
7. When reaching the mouth of the cup, we use scissors to cut off the excess part of the mouth of the cup. 
8. Then we wrap it around the mouth of the cup with our favorite lace. 
9. We wrap the yarn with a deformable hook. 
10. Pinch the crochet hook into a handle. 
11. Make two handles in the symmetrical position of the cup, and add a little decoration to the handles. 
12. Finally, you can add some other details on the cup, such as green leaves, etc., so that our paper cup flower basket is ready. Enjoy!

YOU MAY LIKE: DIY Adorable Pinwheel with Q-tips Tutorial

Sharing is Caring:

DIY Adorable Pinwheel with Q-tips Tutorial

When I was a kid, I used to make pinwheel in the classroom with my classmates. The pinwills made by the students are really colorful! Red, white, green, and purple… At that time, the windmills I made were colored, and I thought my pinwills were the most beautiful, because they were made by my brain.

Now, I also enjoy making little Pinwheels with my kids. Do you believe? Use Q-tips and a small bottle cap to make a small rotating pinwheel, come and try it!


1. First, we draw two circles on the paper. 
2. Draw another small circle in the circle. 
3. Use a crayon to paint your favorite color in the circle. Remember that the small circle in the middle does not need to be painted because it needs to be cut. 
4. Cut out the circle with scissors, and the small circle in the middle. 
5. Take out 6 Q-tips. and cut in the middle. 
6. Apply double-sided tape or glue on the back of the cut circle. 
7. Stick the Q-tips you just cut on the circle neatly one by one. 


8. The other circle is also stuck to the Q-tips. 
9. We put various colors on the cotton tip of the Q-tips with a watercolor pen. 
10. We prepare a straw and cut a section. 
11. Insert the cut section of the straw into the center of the circle as a bearing. 
12. Then we prepare two Q-tips and glue them together. 

13. Put the glued cotton swabs through the bearing. 
14. Glue a Q-tips on the other side as well. 
15. We prepare a bottle cap and put some plasticine inside the bottle cap as a base. 
16. Insert the assembled windmill into the plasticine.
17. In this way, our handmade small windmill is completed.  Enjoy!

You may also like: DIY Paper Rainbow Umbrella Tutorial

Sharing is Caring:

DIY Paper Rainbow Umbrella Tutorial

This is a very creative craft – DIY rainbow umbrella. These little umbrellas look so small and cute, your little ones will love them. Let’s spend quality parent-child time with our children.

For this DIY Paper Rainbow Umbrella project, materials you will need:
Colored paper, double-sided tape, scissors, pen

1. First, we use a circular tool to draw a circle on the paper. 
2. Cut the drawn circle with scissors. 
3. Fold the cut circular paper in half. 
4. Fold in half again. 
5. Put double-sided tape on the folded surface.
6. Then fold it in half to make the double-sided tape and paper stick firmly. 
7. Put double-sided tape on the paper. 
8. Then repeat the above steps. We can take it with a variety of different colors of paper. Double-sided tape must be in the same direction. 
9. We glue the finished papers of various colors together layer by layer. 
10. We glued all the colored papers together. 
11. We are using other paper to make the handle of the umbrella.
12. We roll the paper into a straw shape. 
13. Apply double-sided tape to the cross section of the colored paper that was glued together earlier. 
14. Paste the umbrella handle we made with the previous cross section. 


15. We open the colored cross-sections and paste them together. 
16. Cut off the excess umbrella handle. 
17. Then bend it and glue it together.

18. In this way, our small handmade paper umbrella is ready. Do you like it?

You may also like: DIY Origami Mini Tote Bag Tutorial

Sharing is Caring:

DIY Origami Mini Tote Bag Tutorial

Origami is a very interesting handmade activity, it is an art activity in which paper is folded into various shapes. Origami originated in China in the 1st or 2nd century AD, was introduced to Japan in the 6th century, and then spread to the world through Japan. Today, we are going to share a DIY origami mini tote bag tutorial.
1. First, we prepare a square piece of paper, you can choose the color you want and fold it in half. 
2. Continue to fold in half in the other direction. 

3. At one end of a corner, fold to the middle point.
4. Continue on this basis and fold to the middle point again. 
5. Repeat the above operation in the other direction. 
6. Then we opened the paper and got a creased piece of paper. 
7. We fold in half again. 
8. Fold the bottom edge of the triangle up. 
9. Fold the right edge to the middle. 
10. Fold the left edge to the middle. 
11. Unfold the sheet again and fold one corner to the middle according to the crease. 
12. Do the same steps as above for the opposite corner. 
13. Unfold and fold inwards according to the crease. 


14. Fold the exposed sides inwards. 
15. Follow the crease to form this look. 
16. Fold the exposed sides inwards. 
17. We use thin strips of paper to make the handle of the bag. 
18. Finally, we use the brush to draw the pattern we like.  Such a small and cute tote bag is ready, I hope you like it and have a good time!

You may also like: How to DIY Cute Caterpillar with Orange Peel

Sharing is Caring:

How to DIY Cute Caterpillar with Orange Peel

When I was a kid, I really enjoyed listening to caterpillar stories. The most profound memory is that there was a green caterpillar crawling and crawling. He was hungry and wanted to find something to eat. On the first day, he saw a red apple and ate it with a big gulp. The next day, he found two yellow bananas and ate them with a big mouthful. Day three….Day four……

So, today we will use the orange peel to make a cute caterpillar. This project is very good for kids. They will have fun. So Please don’t throw away the orange peel after eating the orange. Lets’s start.

First, we peeled the orange peel, then scooped it out into a circle with a plastic cover, and repeated this step, so we got a lot of small circles,as shown in the picture above.

Then we take a plate, put a leaf on it first, then put the round orange peel next to the leaf, and arrange them in the shape of a caterpillar according to the opposite direction. Then we use a black pen to draw the tentacles, then draw the mouth and feet, and put two black and white jelly beans as eyes.

A cute and beautiful caterpillar is ready, do you like it?

MORE GOOD IDEAS HERE.

Sharing is Caring:

How to Draw the Model of the Jack-o-Lantern by C4D

Halloween is coming! The pumpkin is an iconic symbol of Halloween. Pumpkins are orange, so orange has also become a traditional Halloween color. Carving jack-o-lanterns from pumpkins is also a Halloween tradition that also dates back to Ireland. Legend has it that a man named Jack was so miserly that he couldn’t enter heaven after death, and because he made fun of the devil he couldn’t enter hell, so he could only wander around with a lantern until Judgment Day. Thus, Jack and the jack-o-lantern became symbols of the cursed wandering spirit. In order to scare away these ghosts on Halloween, turnips, beets or potatoes are carved into scary faces to represent Jack with a lantern, which is the origin of the Jack-o’-lantern. When the Irish moved to the United States, they began to carve with pumpkins, which are more abundant than turnips in the American fall. Now, if people hang jack-o-lanterns in the windows on Halloween night, it means that those in Halloween costumes can knock on the door for candy.

Today we are going to share how to use C4D to draw the model of the jack-o-lantern.
1. First, we build a sphere and change the sphere into 12 segments. 
2. Turn the sphere into an editable object and press the shortcut key C. Change to face mode and select the top face. 


3. Use internal extrusion, shortcut key I, to extrude the empty hole above. 
4. Select all the faces (CTRL+A), and then use Extrude (D) to extrude a face. Remember to tick Create cap. 

5. We select an edge every other.
6. Then we use the chamfer function (M, S) to chamfer the corner and turn off the subdivision. 
7. We select another edge that was not selected before. 
8. Repeat step 6. 


9. We add a subdivision surface to the sphere. If you think the pumpkin is not flat enough, you can use T to shrink it inward. 
10. We use two cubes as the eyes of the pumpkin, which can be switched to other views. 
11. We turn the two cubes into editable objects, switch to point mode, select these points, and pull down. 
12. Using the spline brush tool, draw the pumpkin’s mouth. 


13. Extrude the splines and align them with the eyes.
14. Turn the mouth into an editable object and merge it together.
15. Merge the two eyes and mouth together.
16. Then use the Boolean tool to insert the eyes and mouth into the previous pumpkin.  That’s it!

MORE GOOD IDEAS HERE.

Sharing is Caring:

How to Draw Cartoon Pencils by AI

Pencils, as our earliest writing tools, can be erased at any time and are easy to carry. When I first went to school, I always put several spares in the pencil case, in case the exam questions could not be solved, I broke the pencils when I was angry.
Today, what we are going to share is how to draw cartoon pencils by AI. It’s so easy that even beginners can master it easily.
1. First, we use the rectangle tool to draw a rectangle and fill it with the color we like. 
2. Using the Polygon Tool, draw a triangle to match the previous rectangle. 
3. Using the rectangle tool, draw a rectangle and place it under the pen holder. 
4. Then use the rectangle tool to draw the eraser of the pencil. 
5. Select the rectangle tool of the eraser, use the direct selection tool (shortcut key A), select two anchor points, and pull to make them rounded. 
6. Using the rectangle tool, draw a rectangle in the middle of the pen as the pencil lines. 
7. Copy the triangle of the pen tip in place and fill it with different colors. 
8. Select the tip of the pen and use the eraser tool to erase an arc. 
9. Delete unnecessary parts. 
10. Select the part except the tip of the pen. 
11. Add a stroke of a certain color and thickness.  That’s it! Have fun!

Do you know the origin of the pencil’s name? Pencils originated in ancient Rome more than 2,000 years ago. At that time, the shape of pencils was very simple: a lead rod was sandwiched in a metal sleeve, which was named pencil as the name suggests. With the advancement of science and technology, the pencil also began its evolutionary history. In 1564, someone in Barrodale discovered graphite, a black mineral, and graphite can leave traces on paper, which is darker than the traces of lead. People call graphite “black lead”, but it is easy to be hacked. In 1662, the first pencil factory in the world was built in Nuremberg, Germany, the Shidelou Pencil Factory. In 1761, German Farber mixed graphite powder with rosin, sulfur, etc. to make strips, with high toughness and suitable hardness, easy to write and not easy to get dirty hands, which made pencil manufacturing technology take a big step forward. At the end of the 18th century, the pencil industry was initially monopolized by Britain and Germany. Later, France also found graphite mines in its own country. However, due to the small output, the graphite was mixed with clay for firing, and economical pencils were made. core. So that’s why you don’t get lead poisoning when you get stabbed with your own pencil, because pencils don’t contain lead, they’re just graphite and clay. But it’s too bad if you stab someone with a pencil.
MORE GOOD IDEAS HERE.
Sharing is Caring:

Tutorial for Drawing Cartoon Oranges with AI

Who doesn’t love oranges? They are both beautiful and delicious, today we will use AI to draw cartoon oranges.
1. First, we use the ellipse tool to draw a perfect circle and fill in the color you like. 
2. After duplicating a perfect circle, make it smaller inward and hold down the SHIFT+ALT keys. 

3. Use the same method again and draw a white circle inside.


4. Select the circle in the middle, and then use the eraser tool to erase the edge of the orange. 
5. Select the outermost circle and divide it in two with the Knife Tool, remember to hold down the SHIFT+ALT keys. 
6. Fill half of it with other colors you like. 
7. Adjust the distance between each circle again. That’s it.

Common sense of life:

Do you know? Oranges are rich in vitamin C and P, which can increase the body’s resistance, increase the elasticity of capillaries, and reduce blood cholesterol. People with hyperlipidemia, high blood pressure and arteriosclerosis often eat oranges. The cellulose and pectin substances contained in oranges can promote intestinal peristalsis, which is conducive to clearing the bowels and expelling harmful substances in the body. Orange peel is sweet, bitter and warm in taste, and its effect on relieving cough and phlegm is better than that of tangerine peel. Oranges have almost become synonymous with vitamin C.
In fact, it is rich in vitamin C, which can enhance the body’s resistance and expel fat-soluble harmful substances from the body. It is a healthy antioxidant in line with its name. Orange peel is also called yellow peel. In addition to the ingredients in the pulp, it contains more carotene, which can be used as a stomachic agent and an aromatic flavoring agent. Orange peel also contains a certain amount of orange peel oil, which is effective against chronic bronchitis.
For women, eating more oranges has an unexpected benefit, which is to reduce the incidence of gallstones. According to a survey in the United States, 2/3 of the 19 million patients with cholecystitis in the United States are women. Women are prone to gallstones because estrogen causes cholesterol to accumulate in bile, which leads to high cholesterol concentration and stone formation. Oranges can play a significant role in reducing the occurrence of gallstones.

More good ideas HERE.

Sharing is Caring:

How to Draw a Realistic Fan with C4D

Electric fan, referred to as electric fan, is a household appliance that uses a motor to drive the fan blades to rotate to accelerate the circulation of air. It is mainly used for cooling and relieving heat and circulating air. Widely used in homes, classrooms, offices, shops, hospitals and hotels and other places.

Today we use C4D software to draw a realistic fan. First of all, you can take photos of fans from all angles on the Internet or in your own home, so as to make fans easier.
1. We can start from the middle position of the fan, as shown in the figure, first make the axis position of the fan.
2. Then we make the shaft wheel of the fan as shown. 
3. Put a protective cover on the axle wheel. Of course, these are all details, you don’t need to be so meticulous. 
4. We make the fan blades on the protective cover. The fan blades of the fan are curved. 
5. Let’s add a circle around the fan blade as a protective layer for the fan blade. 
6. Make the protective cover of the shell as shown in the figure. 
7. Add a protective cover. 
8. Let’s add a layer of measures to what is shown in the picture. 
9. Then there are outer measures. 
10. Don’t forget the measures section in the middle. 
11. Having done the previous part, let’s add a layer of measures to the latter part. 
12. As before, perfect the following measures. 
13. After the whole upper part is finished, we start to make the pole of the electric fan. 
14. Make the bottom disc of the pole as well.
15. Of course, we can also do some details and make small cushions at the bottom.  16. Then we use subdivision surface to make the whole fan more perfect. 
17. Let’s make a scene, you can put some sundries such as ice cubes in the scene. 
18. Adjust the angle, turn on the lights, and set the renderer. Wait for rendering. 
19. A finished realistic fan rendering is ready.  Enjoy!

MORE GOOD IDEAS HERE.

Sharing is Caring: